Remote Access to Home Assistant with Cloudflare Tunnel and mTLS
Remote Access to Home Assistant with Cloudflare Tunnel and mTLS#
Sooner or later every Home Assistant user hits the same question: how do I get to my dashboard when I’m not at home? I went through a few answers before landing on one I’m actually happy with, and this post is both the reasoning and the full setup guide.
I ran remote access through Tailscale for a long time. It works, it’s well built, and I still use it — just not for Home Assistant.
The problem was my phone’s battery. I kept the Tailscale app running permanently, because that’s the only way Home Assistant is convenient: you want to open the app and have the light turn off, not open the app and remember you need to enable a VPN first. Leaving it on all day cost me noticeably more battery. An always-on VPN tunnel means the phone’s radio never really settles.
The alternative was toggling it around each use, and I tried that too. Unlock phone, open Home Assistant, realise the VPN is off, switch apps, toggle Tailscale, switch back, wait for the reconnect. Maybe eight seconds — which is an eternity when the alternative is standing up and using the wall switch.
So I was choosing between a battery cost I paid all day and a delay I paid every time. Neither felt right for something I use in ten-second bursts.
Then I moved to a Cloudflare Tunnel with mutual TLS, and it solved both. Spoiler: the companion app now just opens and works, instantly, on any network, with nothing running in the background.
The Goal#
What I wanted:
- Reach Home Assistant from anywhere, instantly, with no app to toggle and no background battery drain
- Never have Home Assistant sitting on the open internet protected only by its own login page
- No periodic re-authentication
- Free, or close to it
Why mTLS and Not a Login Page#
Cloudflare’s documentation steers you towards Access with an identity provider. That’s the standard answer, and for a web app you open in a browser it’s a good one. It isn’t a good answer for the Home Assistant companion app.
Access assumes a browser: a redirect to your identity provider, a login, a redirect back, a session cookie. The companion app isn’t a browser — it’s a native app holding a WebSocket open, and dropping it into the middle of an OAuth dance is awkward at best. Even where you make it work, Access sessions expire on a schedule, so every so often you’re authenticating again. That puts you right back where Tailscale left you, doing a small chore before you can turn off a light.
A client certificate has no session. It sits in the phone’s keychain and it’s either valid or it isn’t. You pick the expiry when you issue it, and Cloudflare will happily sign one for ten years. Set it up once, and “once” genuinely means once.
One thing to watch: the two mTLS implementations at Cloudflare are not priced the same. Access mTLS, the Zero Trust one, needs a paid plan. The zone-level client certificates used in this guide work on the free plan with Cloudflare’s managed CA. It’s easy to land on the wrong docs page and conclude this costs money.
The Downsides#
This isn’t strictly better than Tailscale. What you give up:
- No direct connection. Tailscale is end-to-end between your devices. With Cloudflare, every request is decrypted at their edge and re-encrypted down the tunnel, so Cloudflare can see the traffic.
- One service, not your network. Cloudflare mTLS covers a single HTTP hostname. No SSH to the NAS, no router admin page.
- Setup is longer. Generate a certificate, convert it, install it, select it in the app — per device. Tailscale is easier to get running.
- Certificates are per-device. New phone means repeating the install.
- Watches are out. A watch can’t present the certificate, so it’s LAN-only.
None of these are blockers for me. I’m already trusting Cloudflare with DNS for the domain, the traffic is me toggling lights, and Tailscale is still installed for everything else.
What You’ll Need#
- A domain name — any registrar, any cheap TLD. This is the only thing that might cost you money.
- A Cloudflare account on the free plan
- Home Assistant, reachable on your LAN
- OpenSSL, for one command
- The Home Assistant companion app, on a recent version
Steps 1 and 2 cover the account, the domain and the tunnel from scratch. If you already have cloudflared running against a hostname, jump straight to Step 3.
Step-by-Step Setup#
Step 1: Create a Cloudflare Account and Add Your Domain#
Skip this if your domain is already on Cloudflare. If you’re starting from nothing, this is the part that takes the longest in wall-clock time, so do it first.
- Sign up at dash.cloudflare.com. The free plan is all you need — no card required.
- Get a domain, if you don’t have one. Any registrar works. A cheap
.comor.euis fine; nobody sees this hostname but you. - Add the domain to Cloudflare. In the dashboard, select Onboard a domain, enter your apex domain (
example.com, notha.example.com), and pick the Free plan. Cloudflare scans your existing DNS records and then shows you two nameservers to use. - Point your registrar at those nameservers. Log in to wherever you bought the domain, find the DNS or nameserver settings, and replace the existing nameservers with Cloudflare’s two. If DNSSEC is enabled at the registrar, disable it first.
Full instructions: Onboard a domain and Full setup: change your nameservers.
Propagation can take up to 24 hours, though it’s often much quicker. Cloudflare emails you when the domain is active — don’t start Step 2 until it is, because the tunnel can’t attach a hostname to an inactive domain.
You only need one domain for all of this. Every subdomain after that is free and instant.
Step 2: Install cloudflared and Create the Tunnel#
cloudflared is the small daemon that runs on your network and opens an outbound connection to Cloudflare. Nothing is exposed inbound — you never touch your router.
On Home Assistant OS or Supervised, the community add-on is by far the easiest route. Follow the install instructions in the Cloudflared add-on README: it adds the repository to your add-on store, and the add-on’s own documentation covers the Cloudflare login and the hostname configuration. The project recently moved to a new GitHub organisation, so use the link in that README rather than an older repository URL you might find in other guides.
On Docker or Home Assistant Core, install cloudflared on the host and create the tunnel from the Cloudflare dashboard:
Either way the outcome is the same: a public hostname like ha.example.com pointing at your Home Assistant service, usually http://homeassistant.local:8123 or http://<your-ha-ip>:8123.
Tell Home Assistant about the proxy. Otherwise every request looks like it came from the tunnel’s local address, and IP banning becomes useless. In recent versions this lives in the UI under the HTTP server settings: turn on Trust X-Forwarded-For and add the proxy address (127.0.0.1, or 172.30.33.0/24 for the add-on) to Trusted proxies. Older versions use an http: block in configuration.yaml. See the HTTP integration docs for your version.
Confirm the hostname loads in a browser before adding mTLS. Debugging two things at once is miserable.
One warning: at this point Home Assistant is reachable from the internet with nothing but its own login page in front of it. That’s exactly the state the next three steps fix, so don’t stop here.
Step 3: Create a Client Certificate#
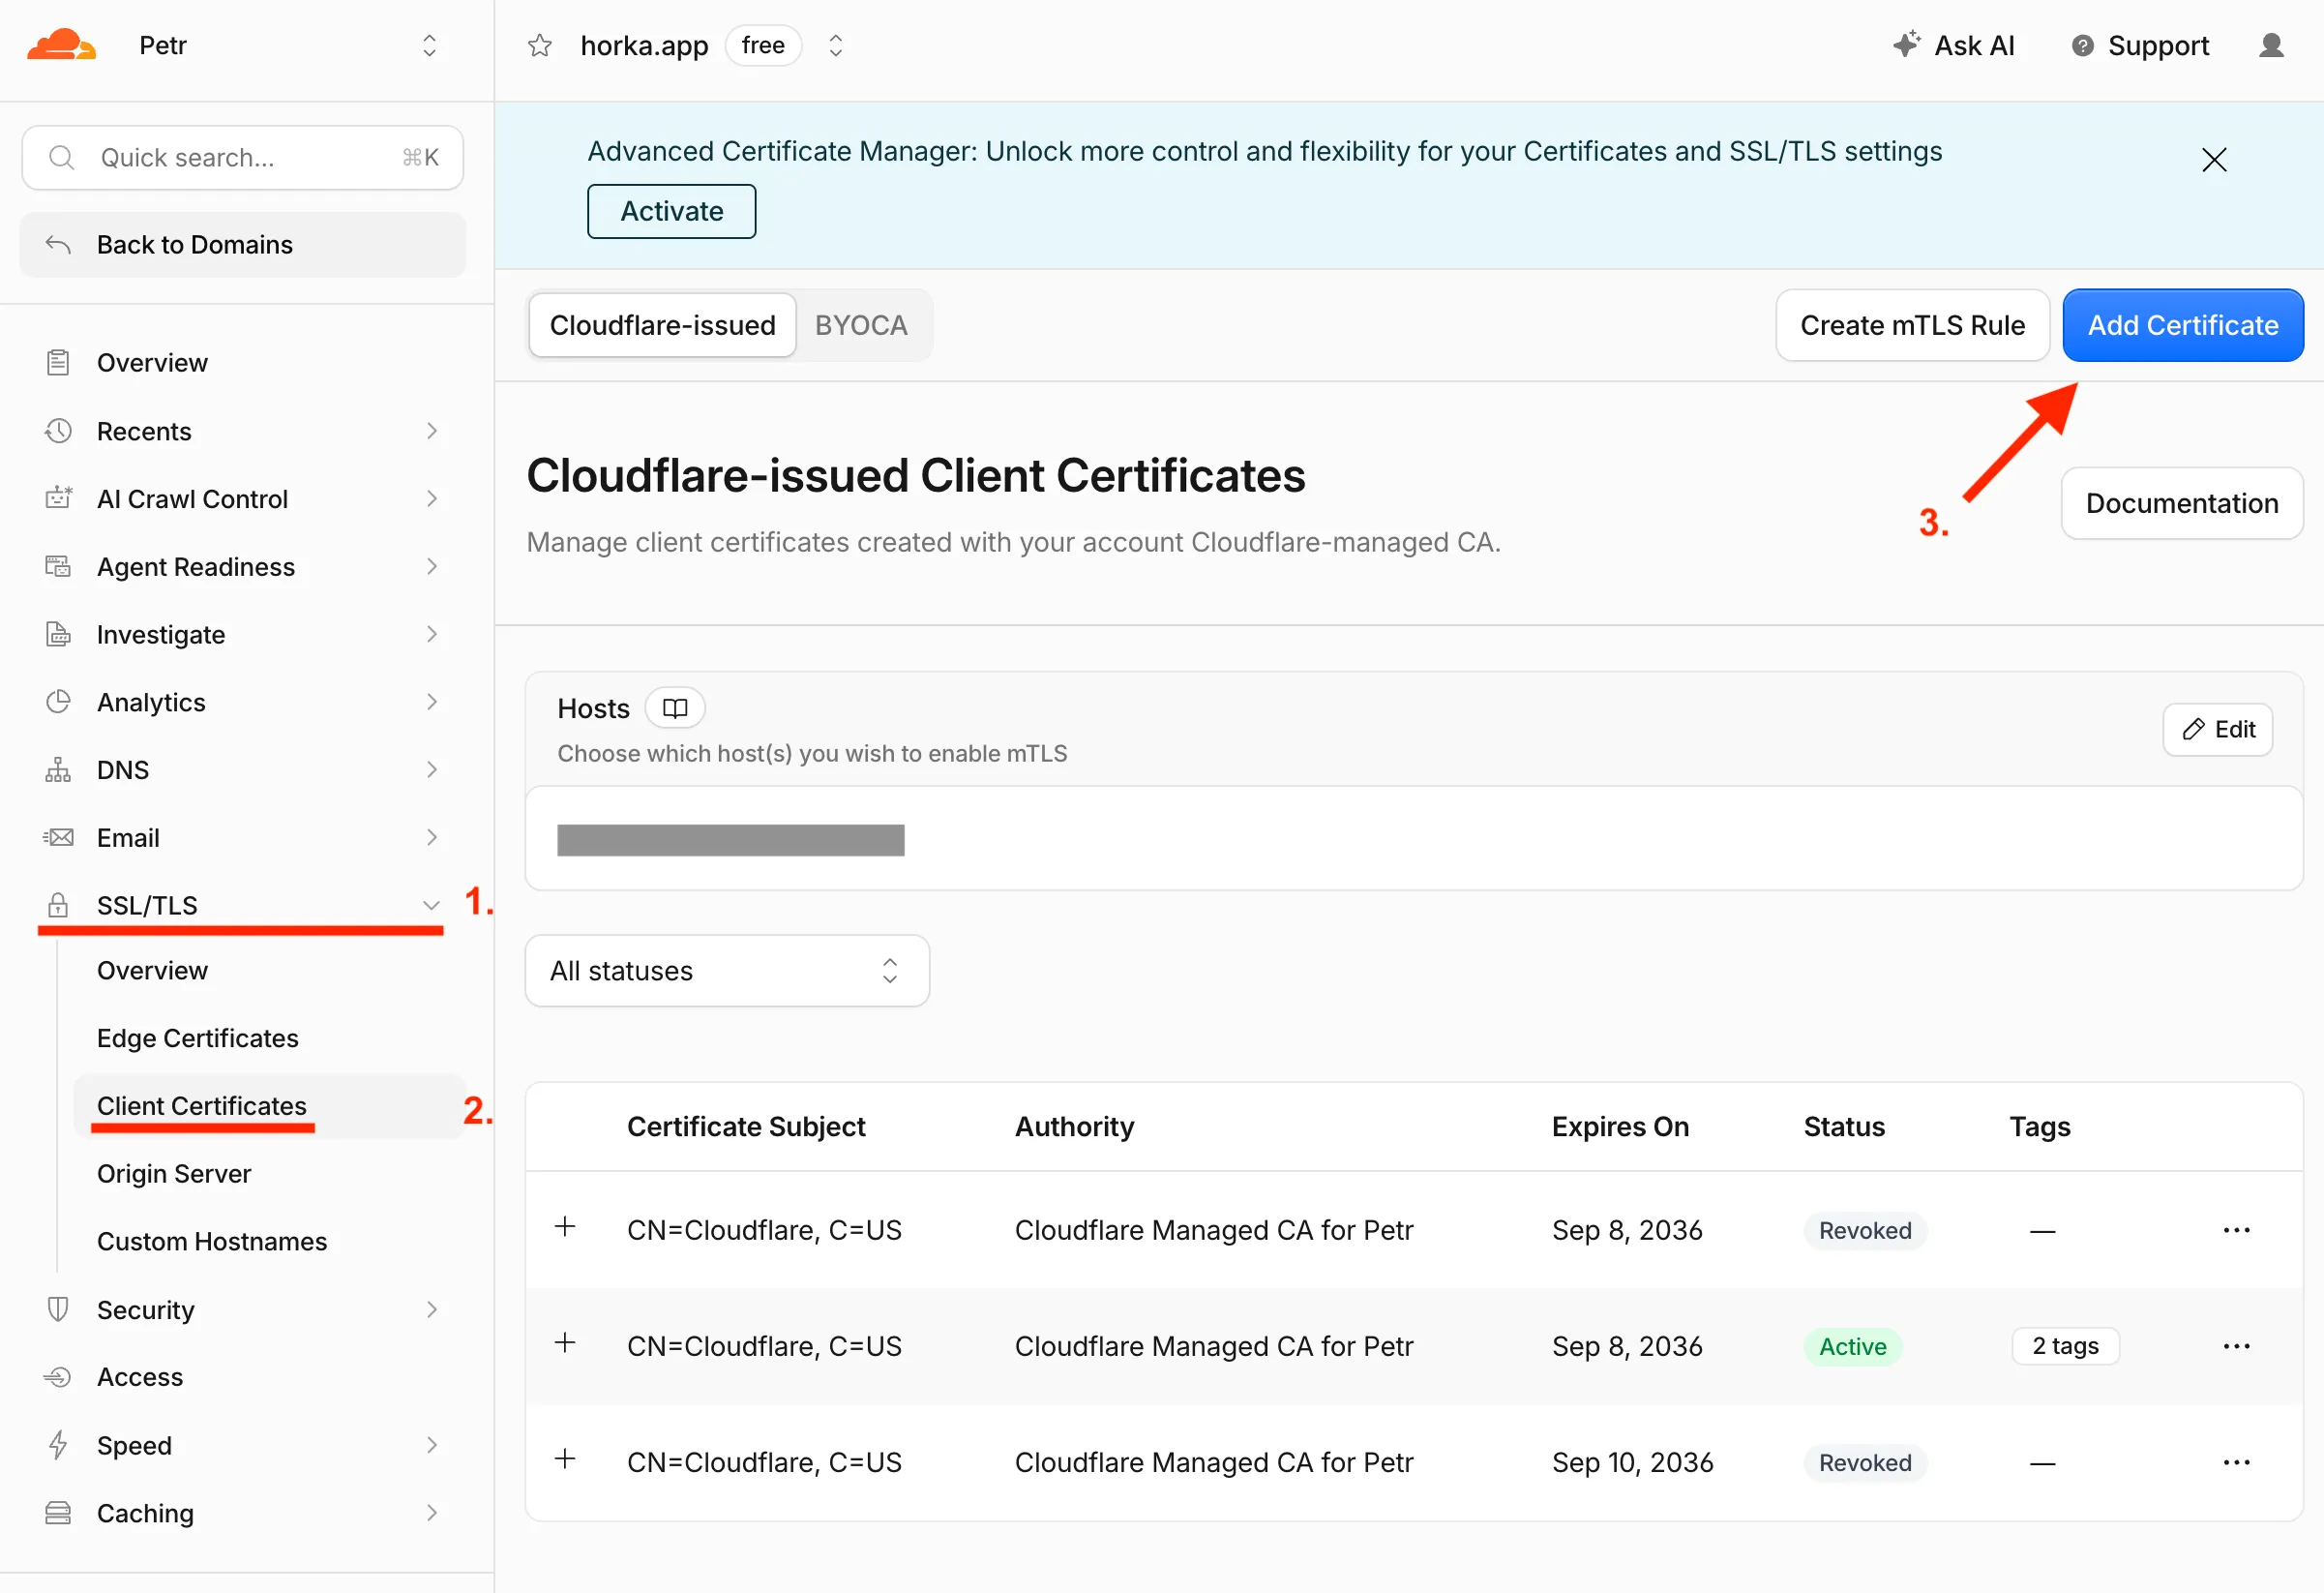
In the Cloudflare dashboard, go to SSL/TLS → Client Certificates and create one.
Set the validity long — ten years is allowed, and re-issuing this annually is exactly the kind of chore that makes people abandon a setup.
Download both the certificate and the private key. The key is shown only once. Save them somewhere safe.
Docs: Client certificates overview and Create a client certificate.
Step 4: Require the Certificate on Your Hostname#
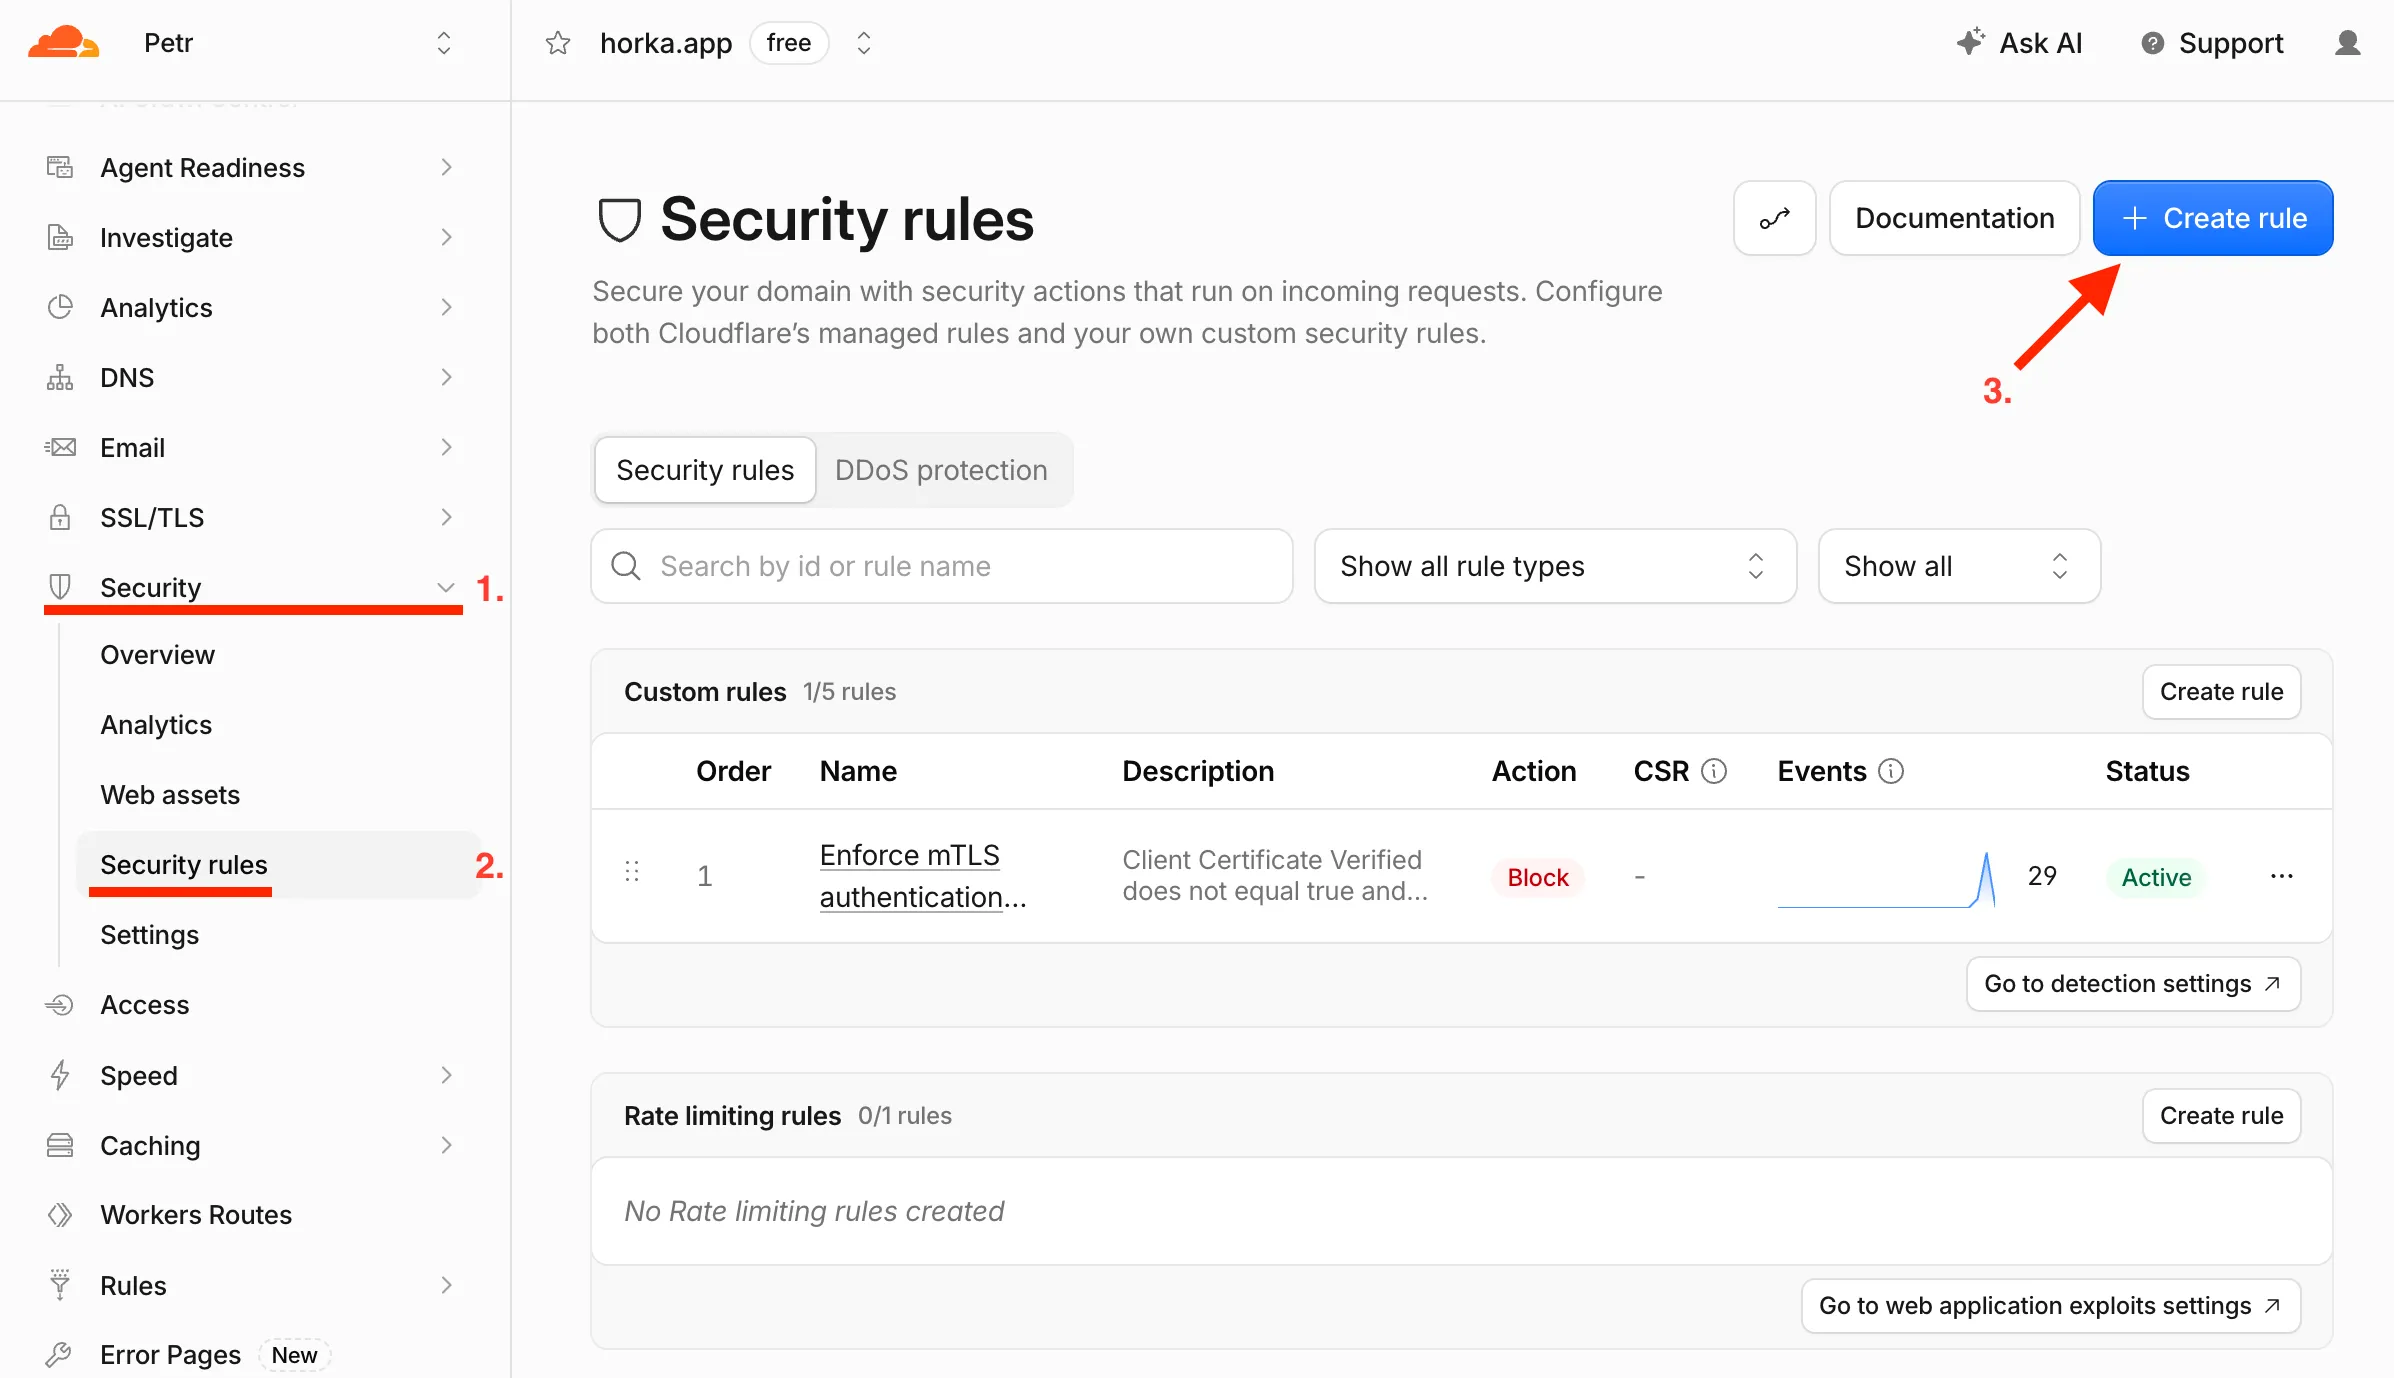
Still on the Client Certificates page, find the Hosts section, select Edit, and add your subdomain. Cloudflare appends the domain automatically, so for ha.example.com you type just ha.
This makes Cloudflare ask for a certificate. To actually enforce it, use the Create mTLS Rule button, which gives you a WAF custom rule template:
(http.host eq "ha.example.com" and not cf.tls_client_auth.cert_verified)Set the action to Block. The free plan includes five custom rules, so this fits comfortably.
Now test it:
# Should be blocked
curl -sv https://ha.example.com

# Should return 200
curl -sv https://ha.example.com --cert cert.pem --key key.pem
Docs: Enable mTLS for the hostname, and mTLS for application security for the enforcement side.
Step 5: Convert the Certificate for Your Phone#
Phones want PKCS#12, not PEM:
openssl pkcs12 -export -in cert.pem -inkey key.pem -out client.p12Set a password when prompted — the import expects one.
Step 6: Install It and Connect (Repeat per Device)#
This step runs once for every device you want to use remotely — your phone, your partner’s phone, your iPad, your laptop. The certificate lives on the device, so a device without it simply can’t get through. There’s no “log in from a new phone” moment here; you install the certificate first, and only then does the app work away from home.
You have two options for that. You can reuse the same .p12 on every device, which is simplest but means revoking it locks out everything at once. Or you can issue a separate certificate per device back in Step 3, which takes a few extra minutes but lets you revoke a lost phone without touching anything else. The free plan allows up to 100 active certificates per zone, so there’s plenty of room either way. I’d go per-device for anything you carry outside the house.
For each device:
- Send the
.p12to the device and open it. On iOS this installs a profile. - Trust it under Settings → General → About → Certificate Trust Settings in your iPhone.
- In the companion app, add your server using the external URL. The app will prompt you to choose a client certificate — pick the one you just installed.
- Set the internal URL to the LAN address, so at home the traffic goes straight to Home Assistant instead of touring a Cloudflare datacenter and coming back.
Worth doing on a laptop too if you ever open Home Assistant in a browser away from home — otherwise it’ll just fail, and you’ll have forgotten why by then.
(Android supports client certificates too, but I’m on Apple devices and can’t walk you through that side.)
Troubleshooting#
The tunnel won’t accept my hostname:
- Check the domain is active in Cloudflare — the nameserver change from Step 1 has to finish first
- Use a subdomain of a domain in your Cloudflare account, not one hosted elsewhere
Everything returns 403, even with the certificate:
- Check the hostname in the WAF rule matches exactly, including the subdomain
- Confirm the host was added in the Hosts section, not just the certificate created
- Test with
curlfirst — it gives clearer errors than the app
Home Assistant logs complain about an untrusted proxy:
- Revisit the Trust X-Forwarded-For and Trusted proxies settings from Step 2
Results#
I open the app and it works. No toggle, no waiting, and nothing running in the background to make it possible. The setup took an evening and I haven’t thought about it since, which is the highest compliment I can pay any piece of home infrastructure.
One More Thing: Support Home Assistant
If you don’t want to manage any of this yourself, Home Assistant Cloud from Nabu Casa gives you secure remote access with roughly two clicks, plus cloud backups and the Alexa and Google integrations. It’s the officially supported route and it’s genuinely good.
More importantly, the subscription is what funds Home Assistant’s development. It’s a free, open-source project that a lot of us depend on daily.
I pay for it and I’d encourage you to as well — I just wanted to manage access to my own instance myself. Those two things aren’t in conflict. If this guide saved you a subscription you were going to pay anyway, please consider subscribing regardless. The project deserves it.
Running something similar, or solved it a different way? Drop a comment below!
Comments
Join the discussion! Comments are powered by GitHub Discussions.